{metacanonical:http://theprojectjunkie.com/watercraft/canoe-motor-mount.html}
Canoe Motor Mount
.jpg)
If you're like me, paddling sucks... OK, if you're going for exercise it's great but if you're out to go fishing and want to relax and enjoy yourself this is a great project for you.
I actually did this project a year and a half ago but lost the pictures and video after my computer crashed and then my backup hard-drive crashed- Bad Luck but no worries. Anyways, I've had some people ask me about this motor mount and so I thought I'd tare this thing apart and show you how I made it. There are several types of mounts out there but this is my own version of it.
The whole motor mount project should only take you about 30 min to 45 min to make and cost about $10. Seriously, it'll take you longer to go to the hardware store to get the materials than it will to do the project.
Canoe Motor Mount Materials
Remember that all canoes are made similar but can have very different components than this canoe- a Pelican 15.5'. If you canoe is different you may need to adjust the materials in your motor mount to make it work.
You'll need 1- 4' x 2.5" x .75" piece of either solid hard wood or some decent plywood (marine grade plywood if you can). Here, I just used a solid piece of Oak but recommend using plywood if you can- Solid wood are more prone to splitting. Note: 1" thick board will probably work a tad bit better but I haven't had any problems with this mount other than a slight wobble when I kick the motor on hard.
.jpg)
You'll need 6 wood screws. You can see them in the blocks in the picture below. I believe these screws are 1.25" long. However, just make sure that the screws are long enough to get a good grab on the board your screwing to with out going through. Here I've also accounted for the screws countersink.
.jpg)
This is just a piece of treated 2x4 That I cut to just fit the motors mounding bracket/clamp. You'll notice that there are two circles on this board which show where the motor's clamping screws tighten on the board. You can probably use regular 2x4 but I think the treated will last longer- so if you've got it use it.
.jpg)
These are 4" wood lags (wood bolts or wood screws), I don't remember the size but the head fit an 11mm socket. I used 3 lags and they work great.
.jpg)
I used 2- .5"x 2" bolts with locking nuts and 6 washers. The washers are a size smaller than the normal .5" ones. I found that the .5" washers had a bigger hole than I wanted. The washers are pretty thick about 3/16". If you decide to use a thicker base board, rather than the .75" oak that I used, you'll need to get longer bolts.
.jpg)
Building the Motor Mount
The first thing you've got to do is figure out how long you want your base board to be. In the picture below you can see that my base board is already cut, but let me explain how I did it.
Figure out where you want the mount's base board to be positioned on the canoe- I have positioned my base board about 4" to 5" just behind the canoe's rear seat. I made sure the board was parellel to the seat and then positioned a couple of washers so that the holes were lined up with the out side of the canoe's gunnels/gunwales. I then placed my mounting block on as close to the washer/canoe as I could with out the mounting block overlapping the washer. Then I cut the base board at the edge of the mount block and drilled holes for the .5" bolts at the center of the washers holes. Note: if your washers are too big in diameter you may have problems when fastening the mount to the canoe gunnels.
.jpg)
Here's a look at a hole for one of the .5" bolts.
.jpg)
Next I put the bolts into the holes and pushed the base board as far forward as I could, or rather until it was fairly snug. I also made sure that the base board was still parallel to the back of the back seat.
.jpg)
The bolts do a great job of keeping the mount from moving toward the front of the boat but the mount can become loose and pop off if there is too much pressure on the base board pushing it toward the back of the canoe. So there needs to be some blocks made that will attach to the under side of the base board to prevent the base from slipping backward on the canoe.
I don't know if you can see it real great in the picture below but I am just using a pencil to mark the inside of the canoe gunnels on the bottom of the base board.
.jpg)
Now I've flipped the board over and you can see me pointing at the line I just drew on the bottom of the mount's base board- The blocks will be cut the same angle as this pencil line. Just set your miter saw angle up to match this line and then cut your blocks out. They don't need to be very big mine are only 2.5" to 3" long and cut from the excess base board.
.jpg)
After the blocks are cut match them up to the line and fasten them with some wood screws. I like to drill pilot holes so that the wood is less likely to split. A pilot hole is a hole drilled that is the same size as the screws main shaft's diameter (Smaller than the thread's diameter). The pilot hole still alows the screw's threads to cut into and hold the wood. I've also counter sunk the screws so that the screw heads are not protruding from the block. Countersinking also helps to prevent the wood from splitting.
.jpg)
.jpg)
.jpg)
Here you can see that The blocks are fastened and ready to go.
.jpg)
Next the mounting block for the motor clamp needs to be attached to the base board. In the picture below I've flip the base board back upright so that the blocks are now on the bottom of the base board.
It is important that the mounting block goes on the back edge of the base board- Otherwise, your motor's clamp won't be able to fit properly.
Here I've traced out the block on the edge of the board and then drilled 3 holes for the 4" wood lags. These holes are not pilot holes and the lags can move in and out of them without having to twist them.
.jpg)
In the picture below I have flipped the board over again so that I can dill some pilot holes into the mounting block for the wood lags. The mounting block is aligned and using the 3 non-piloted holes on the base board I drill the lags' pilot holes into the mounting block. Clamping the mounting block to the base board will help make things easier.
.jpg)
.jpg)
Once the lag holes are drilled, just screw in the lags.
.jpg)
Note: Be careful not to over-tighten the wood lags- you may end up splitting your base board. You can also use some washers if you'd like but I choose not to and haven't had any issues from not using them.
.jpg)
Mounting the Canoe's Motor Mount
I used 1 washer on the top of the base board and 2 washers on the bottom- This seams to work well and I think 1 washer would bend too much. Again when fastening the mount to the canoe make sure it is parallel to the seat.
.jpg)
I tighten these bolts down really good. You'll notice that the bolts are on a slight angle and that's ok.
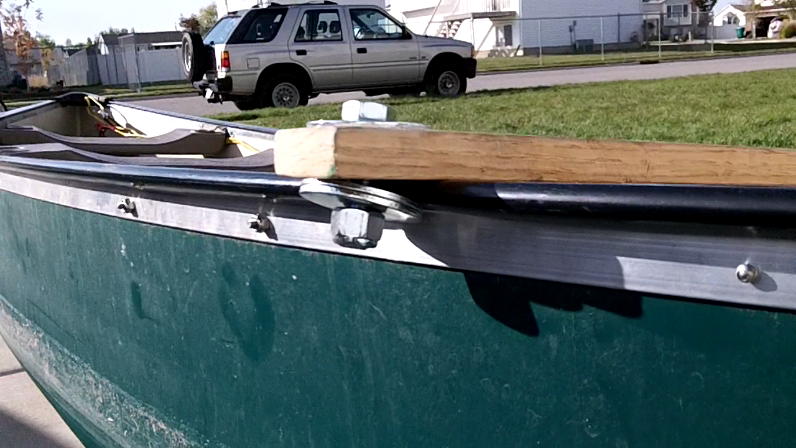
And there you have it- One bona-fide electric motor mount for your canoe.
.jpg)
.jpg)
Final Thoughts
Believe it or not this is my second motor mount. The first one I made was done with some 1" square aluminum tubing as the base. It also didn't have the blocks to keep the base from sliding backward. Basically it was a disaster; first off it was really wobbly and secondly I was out fishing and leaned too far back, putting pressure on the base, and the mount popped off the canoe! Luckily I didn't loose anything except my pride
So I made this mount and in the year and a half that I've been using it, I haven't had any problems with it (First made in the summer of 2010).
If you're worried about weathering some guys will put a coat of sealer on their mounts. I keep my canoe in the garage except for when I'm using it and haven't had any weathering issues.
Good luck, be safe, and have fun!
Let me know if you have any questions.